
TABLE OF CONTENTS
What is a Whelping Box?
So your dog is around 7 weeks into pregnancy; she is in her diestrus phase of her heat cycle. We need to start thinking about the whelping room and whelping boxes. Let’s have a look at what a whelping room is and what should be in it.
Top-Tip
Pregnancy in dogs lasts between 58 and 63 days; around 2 months until puppies are born.
A whelping room is where your pregnant dog will give birth to her puppies. It should be calm and quiet – ideally away from busy routes through the house. A dining room is usually perfect. Mom needs to feel safe; that no-one is going to disturb or pose a threat to her puppies.
You should find a quiet corner for your box. A whelping box is where a dam will give birth; it is a small area, safe for her puppies.
You can buy a range of whelping boxes; cardboard, plastic or wood. They are generally around 4ft x 4ft in size with a height around 2 feet – high enough to prevent escapee puppies.
Puppies remain in the box usually until around 4 weeks of age; this is when they become more animated and therefore need more space to roam. This can sometimes vary depending on the breed of dog and how big the puppies are.
Whelping Box Plans and Ideas

Design of a Whelping Box
As we mentioned the box is usually around 4ft x 4ft with a height of around 2 feet – this is so puppies can’t escape.
There is usually an entrance/exit on one side – this can sometimes be a half door or a full door, depending on the size of the Mother. It should allow easy access for Mom to come back and forth from toilet breaks and accommodate for her low mammary glands.
If you have ever seen a whelping box you will notice a rail on the inside of the box; this is known as a pigrail. This rail prevents the Mother from crushing her puppies against the wall of the box. In wooden boxes it is usually a wooden rail, around 4 inches from the floor. In plastic boxes it is quite often plastic piping which has been laid on the floor (think plastic gutter piping).
If Mom rolls over during labor or nursing, she will hit the rail or the plastic piping, preventing any puppy getting stuck in the corner and crushed.
It is possible to use L-Shape plastic trim too – it just needs to be strong enough to not bend under the weight of Mom. Usually, touching the trim is enough for Mom to realize and readjust herself; keeping her puppies safe.
You can construct a whelping box from cardboard, plastic or wood.
| Material: | Advantages: | Disadvantages: |
| Cardboard | Cheap and Disposable | Will easily absorb fluid and excrement. Difficult to keep clean unless plastic lined. Not as strong as other materials. |
| Plastic | Easy to clean, Hygienic and Sturdy | Can be slightly more pricey |
| Wood | Sturdy and Better suited for large breeds | Will absorb fluid and excrement unless waterproofed and Heavier to move. |
Whelping Box Plans and Ideas
There are a range of designs for whelping boxes. However, the three fundamental design principles stay the same:
- Ensure it has a big enough area for the dam and her puppies (minimum 4 foot square of floor space).
- Ensure it has a rail system to prevent the mother from squashing her puppies (i.e. pigrail).
- Ensure it can be easily accessed by the Mother.
Top-Tip
In one of the sides you would cater for an entrance/exit for the Mother (the size would vary based on the size of Mom – a smaller breed would need a lower entrance/exit).
Some boxes don’t have a base; this is usually if the whelping room has tiled flooring as it’s easy to clean. If you are placing it directly onto tiles, ensure you have plenty of newspaper and bedding down to insulate the puppies from the cold floor.
Let’s have a look how you would build your own whelping box.
How to Build a Whelping Box (DIY Guide)
The following guide works well for a cardboard, plastic or wooded whelping box. However, we decided to build a disposable whelping box for the following three reasons:
- Eliminate any chance of cross litter contamination
- Easy recycling/disposal after use
- Our dam was a small breed
Use the pros and cons, which we discussed above, to help you decided which material suits you best. For larger breeds, wood would be stronger and more sturdy. Here we are using a model, so keep in mind it’s not to scale.
Material Checklist
- 1 x 4ft x 4ft base
- 4 x sides measuring 4ft x 2ft
- 4 x trims or piping/guttering for the rail
If you are building a plastic whelping box you will need:
- 4 x 2x4ft – Sheets of plastic (sturdy and do not bend, twin wall is ideal)
- 1 x 4x4ft – Sheets of plastic (sturdy and do not bend, twin wall is ideal)
- 1 x Good quality plastic glue
- 4 x 2ft lengths – Plastic trim (90° L-Shape)
- 4 x 4ft lengths lengths – Plastic trim (90° L-Shape)
- 3 x 4ft lengths – Rail either use plastic piping/guttering or L-Shape trim
If you are building a wooden whelping box you will need:
- 1 x 4x4ft of Plywood
- 4 x 2x4ft of Plywood
- Hammer and Nails
- Wood glue
- Wooden railing (3 x 4ft lengths)
Four Steps to Building a Whelping Box
Step 1
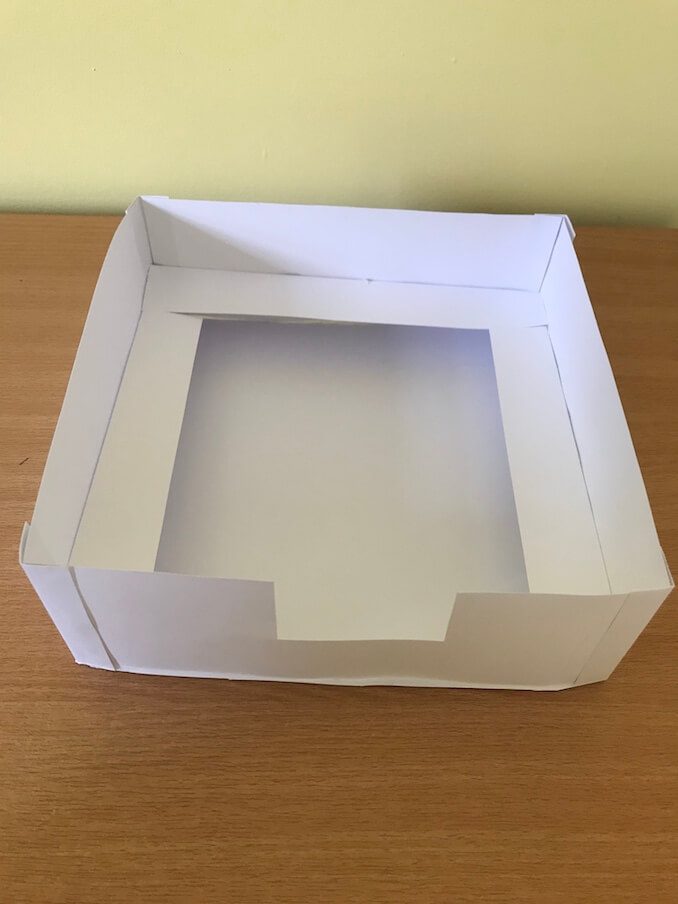
Measure and cut all the lengths that you need. On one of the sides, cut out an entrance/exit – the size of this will depend on the breed of the Mother (how big is she and how low does it need to be for her to easily get in and out).
Step 2
If using plastic, use the 90° L-Shape trim to glue the sides together. Glue along the inside of the trim and attach one side to each length of the trim (If using wood, nail the sides together).
Step 3
Attach the base – again using the trim if using plastic – you could glue the trim on the inside or the outside of the box to suit you. Nail the sides to base if using wood.
Step 4
Attach the rail – if using plastic, glue one side of the plastic trim to the side of the whelping box around 4 inches from the base. If using wood, glue the wooden railing to the sides of the box around 4 inches from the base. Don’t worry about attaching the rail to the side where you have the entrance/exit.
You can also watch this video guide.
Testing and Using a Whelping Box
Once you have built your box, the first step to using a whelping box is to get your dam comfortable when using it; she must feel safe and comfortable.
This starts with your whelping room. Remember to use our guidance above for a whelping room:
- Private and Low Traffic Room
- Placed in a Neutral Environment
Private and Low Traffic Room
The whelping box must be placed in a private and low traffic room in your house (i.e. calm and quiet with no kids, animals, or excitement).
Placed in a Neutral Environment
It should be placed somewhere in a neutral environment (i.e. no drafts, bright sunlight exposure and no direct heat source).
Top-Tip
Once you have placed the whelping box in the whelping room, do not move it.
Getting Her Accustomed
Before your dam gives birth, she should have used (i.e. rested or slept) the whelping box and feel safe being there.
You should try and encourage her to sleep in the box during the last couple of weeks before birth. If she is reluctant to use the box, remember back to your socialization days. Use positive reinforcement and create a positive association for her to using the box. This can take the form of treats or praise.
Summary
As we have mentioned, the design of whelping boxes varies, so don’t worry too much. The important thing is that it is big enough for Mom and puppies, and you have remembered to attach a pigrail to prevent Mum from crushing her pups.
In short, choose the material which suits your budget and DIY skills, ensure it has 4 sides, a base, a way in and out and lastly a rail to keep pups safe.
If you choose plastic and cut it at any point, ensure there are smooth edges; you could attach a trim or tape.
Have you built a whelping box before and do you have some advice to share with our readers? Feel free to comment below.


Be the first to comment