
Treating Fido with a piece of dog furniture this Christmas doesn’t have to cost a fortune.
If you have a spare recycled or reclaimed pallet then it can easily be upcycled to create your own raised dog bowl stand.
And the best part is, elevated dog feeders have many benefits for your dog including: better eating posture, improves swallowing and slows down fast eaters.
This fun project can be built within an hour for less than $10 and is very versatile.
Let’s jump in, below we have our step-by-step guide for you to build one raised dog bowl stand.
TABLE OF CONTENTS
Breaking the Pallet Down and Preparing

Start by breaking down your reclaimed pallet, take a hammer and tear down the pallet into weathered pallet boards. Makes sure you remove any rotten pieces and nails. You will need 9 pallet boards in total to build your raised dog bowl stand!
Cutting the Boards to Size: Measure, Mark & Cut
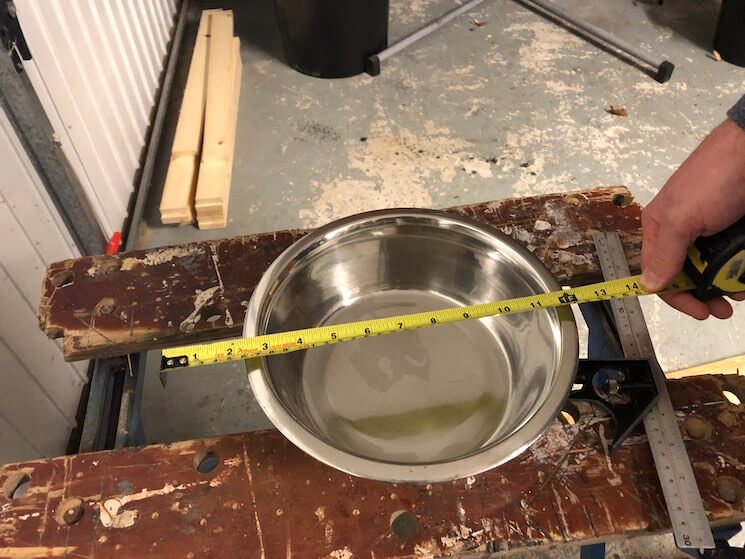
To determine how big the stand needs to be, measure the diameter of the dog bowl. The bowl pictured above is 10″ in diameter.

Take four weathered pallet boards and measure them to size. To determine the correct length, take the measurement from the step above and add four inches. In our worked example that’s 14″ (10″ dog bowl diameter + 4″ extra).

Take a carpenters square, or something level, and draw cut lines at 14″ (or whatever your measurement is) across all four boards.

Using a handsaw, take two boards, and cut the boards. Once you’ve cut these boards, mark them with a ‘D’ for depth pieces.

With the remaining two boards, take one inch (the width of two x depth boards) from the original cut line (14″) and mark a new cutline at 13″.

Using a handsaw again, take these two boards and cut them to size boards. Once you’ve cut these boards, mark them with a ‘W’ for width pieces. With the off-cuts, or some cheap timber (we used pine), cut two support beams; measuring the same length as the width boards.

Once you have finished cutting your six boards, you should have two width boards (13″ in length each), two support beams (13″ in length each) and two depth boards (14″ in length each).
Building the Base: Hammer, Nail & Hammer Again

To build the corners for the stand, you will need to nail the width boards into the support beams and then the length boards into the support beams.

Once you have nailed the corners together, place your dog bowl into the center of the base and make sure your dog bowl fits perfectly in the center.
Fixing the Top Boards to your Raised Dog Bowl Stand

Take your remaining five pallet boards, using the same techniques above, measure, mark and cut the five boards to size. The size of these boards in our example was 14.5″ (the depth boards 14″ + 0.5″ overhang).

Sturdy, Level and Plumb? Once you have cut all five boards, for the top of your Raised Dog Bowl Stand, check the boards fit nicely.

After some measuring, re-adjusting and aligning, you are ready to nail the boards. Take one pallet board each time and nail it to the base.

Repeat the process above until complete. Measure, adjust, align, nail and repeat. Notice the slight overhang for each board in the picture above.

Once you’ve finished nailing the boards down to the base, take a well earned rest!
Finishing Touches!

Place the dog bowl upside down on the stand. Make sure the bowl is centered perfectly and then mark around the circumference with a pencil.

Take a jigsaw and cut along the line to remove the center from the stand.

Sand down any rough edges and smooth the boards to prevent any injuries to your dog.

Finished. Your very own raised dog bowl stand. You can add a fresh coat of paint or stain to give a nice finish – but make sure it’s pet friendly and doesn’t contain any toxic chemicals.

Did you decide to build a raised dog bowl stand? Let us know how you get on below.


Be the first to comment